Athena - Milestone 2
I reached the second milestone for Athena. So that we both have the goal in mind through this post, the milestone was to create a scene were many Jewels would fall onto a platform and interact with one another. I’ll start with requirements again and then talk about the decisions made to achieve those goals.
Athena doesn’t require anything special from a physics engine. The core features are:
- 2D – The game doesn’t have game motion in the z-axis. This allows us to greatly simplify the physics system to only simulate a 2D world.
- Gravity – Jewels need to be affected by gravity once they are in players respective containers.
- Collisions – Collisions need to be detectable easily so that we can determine when a player has matched 3 or more jewels of the same colour
- Forces – The ability to add a force to an object is necessary for when the player shakes their container to hopefully clear some jewels from their container
- Lightweight – Since there aren’t many requirements for the system, I wanted something lightweight that wouldn’t require too many resources.
- Easy on Time and money.
For the last point this is more of a real world practicality that I needed to face with this part of the project. This project is a learning experience for me but it is also a project to help me get a job in the core gaming industry. I started out writing the physics engine from scratch and I was really enjoying doing it, but I quickly saw that it would take me a bit of time to get it done correctly. While building a 2D rigid body system is really cool and a great exercise, the fact is, at this point I don’t have the time and money to do everything from scratch. So I decided to look for a physics engine that would meet all of my requirements. While I am disappointed I wasn’t able to build this system from scratch I think the right decision was made in the end and I learned a valuable lesson that is very relevant to the gaming industry.
Box2D
To make a long story at least a little bit shorter, I ended up choosing Box2D for my 2D physics engine. It covers all of my required features: 2D, supports standard physics engine features like gravity, collisions, and forces all in a lightweight and efficient engine. Box2D is written in C++ so building and linking the library was a very painless process. The documentation for Box2D is fantastic and it is a widely used physics engine for games so you can find a lot of resources online. Finally, Box2D is free, this was a nice bonus.
I’ll touch a bit on how Box2D simulates it’s physics here but if you would like to know more about the engine I would highly recommend their online documentation since it is very well written and even has GDC presentations to go along with it. You can find the docs here.
Box2D uses an integrator. An integrator is a computation algorithm that simulates the physics equations at distinct points in time. This obviously works really well with the core game loops in game engines, where every frame we want to do several things. Box2D also uses a system called a constraint solver. As defined in the documentation a constraint is “a physical connection that removes degrees of freedom from bodies.”. The constraint solver solves every single constraint in the simulation one by one. However solving a constraint disrupts other constraints so Box2D does multiple passes in order to get a good simulation. The Box2D constraint solver is split into 2 phases, velocity and position. The velocity phase handles the movement of the objects and the position phase adjusts the bodies to reduce overlap and joint detachment.
As a small aside, I would like to talk about some of the clean up I did on the project to make my life easier.
Clean Up
After Milestone 1 I essentially just had 1 large main file with a couple other helper files. These files basically represented my graphics subsystem. So I pulled them out of the main file and made them into a more explicit subsystem. This would set the foundation for a core game loop and serve as an example of how to separate other subsystems, for example a physics engine!
As a small example the main program function went from this:
int main(int argc, char** argv) {
    GLFWwindow* window;

    glfwSetErrorCallback(error_callback);

    if (!glfwInit())
        exit(EXIT_FAILURE);

    glfwWindowHint(GLFW_CONTEXT_VERSION_MAJOR, 2);
    glfwWindowHint(GLFW_CONTEXT_VERSION_MINOR, 0);

    window = glfwCreateWindow(500, 500, "Athena", NULL, NULL);
    if (!window)
    {
        glfwTerminate();
        exit(EXIT_FAILURE);
    }

    glfwSetKeyCallback(window, key_callback);
    glfwSetWindowSizeCallback(window, resize_callback);
    glfwSetWindowCloseCallback(window, window_close_callback);

    glfwMakeContextCurrent(window);
    gladLoadGLLoader((GLADloadproc)glfwGetProcAddress);
    glfwSwapInterval(1);


    Init();

    while (!glfwWindowShouldClose(window))
    {
        Display(window);
        glfwPollEvents();
    }

    glfwDestroyWindow(window);
    glfwTerminate();

    exit(EXIT_SUCCESS);
}
to this:
#include "Physics.h"
#include "Renderer.h"

#include <stdlib.h>

int main(int argc, char** argv) {
    AthenaPhysics::Init();
    AthenaRenderer::Init();

    while (!AthenaRenderer::Closed()) {
        AthenaPhysics::Step();
        AthenaRenderer::Display();
        glfwPollEvents();
    }

    AthenaRenderer::Terminate();
    AthenaPhysics::Terminate();

    exit(EXIT_SUCCESS);
}
As you can see the main file now has explicit entry and exit points for my two subsystems. All the code for initializing and drawing of objects is part of the graphics subsystem and the main file no longer needs to know about any of the specific GLFW content (no more header!). The main file also has what looks like a real game loop! We step our physics system, display the results and poll the user for input.
Jewels are now our first game object, with a reference to a basic CubeMesh and a Box2D b2Body.
class CubeMesh {
    static const float vertexData[];
    static const GLushort indexData[];
    const int numVertices = 24;

    GLuint vertexBufferObject;
    GLuint indexBufferObject;
    GLuint vao;

public:
    CubeMesh();
    void Render();
};

/*************************************/

class Jewel {

    CubeMesh* mesh;
    b2Body* rigidBody;

public:
    Jewel();
    Jewel(float x, float y, float angle);
    ~Jewel();
    //Expects a valid program to be set in the context
    void Render();
    b2Vec2 Position();
    float Angle();
};
Both of these are very specific to my needs. Both can use a bit of clean up to make them more efficient and a little more generic, and I will have this done in the near future, but they worked well enough to accomplish my current goal.
Okay so enough about that stuff!
A World Of Pure Simulation
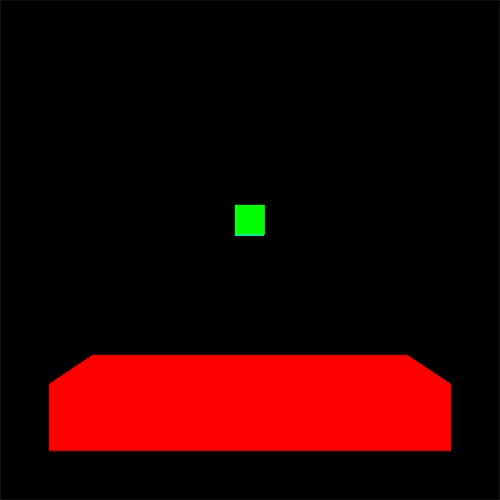
Let’s finally talk about how I integrated Box2D into my engine. I think it is always good to set a goal to move toward, so to start my goal was to have a block falling into an empty scene. A very basic goal but one that is a good step toward my milestone.
First we need to initialize the world which Box2D makes super easy. We simply define a 2D vector that represents the gravity of the world and initialize a world from there.
    b2Vec2 gravity(0.0f, -9.8f);
    PhysicsWorld = new b2World(gravity);
Next we need to define a square rigid body. Remember we can get away with just a square rigid body because even though our game objects are cubes they only move in the X and Y axes. So as you can see in the Jewel class declaration we declare a pointer to a b2Body. This is our reference to a rigid body from Box2D. The process for building a square b2Body is as follows: (please consult the docs for any terms you may not understand)
- Define a Body definition
- Use the physics world to create a body from that definition
- Create a shape for the physics object
- Create a fixture definition
- Set the shape of the fixture to the shape created earlier
- Use the body to create a fixture from the fixture definition
In code this looks like this:
Jewel::Jewel() {
    // Define body definition
    b2BodyDef bodyDef;
    bodyDef.type = b2_dynamicBody;
    bodyDef.position.Set(0.0f, 2.0f);

    // Here we get the same world initialized above
    // in our physics systems Init() function and create a body
    // from the body definition
    rigidBody = AthenaPhysics::GetWorld()->CreateBody(&bodyDef);

    // Create a shape and set it as a box
    b2PolygonShape dynamicBox;
    dynamicBox.SetAsBox(0.5f, 0.5f);

    // Create a fixture and set the shape and other
    // necessary physics properties
    b2FixtureDef fixtureDef;
    fixtureDef.shape = &dynamicBox;
    fixtureDef.density = 1.0f;
    fixtureDef.friction = 0.3f;

    // Finally create the fixture from the definition
    // to give shape and properties to the body
    rigidBody->CreateFixture(&fixtureDef);
}
So this gives us a 2D rigid body that our Jewel object now has a reference to, as well as adds a physics object to the world created in the initialization of our physics system.
We are almost at our first goal. As I mentioned above Box2D uses an integrator meaning it needs to know how to step our world. For simplicity I will show you an example using the recommended step values. If you recall in the main function I called AthenaPhysics::Step() this function is a wrapper for this call to the worlds own step function
static const float AthenaTimeStep = 1.0f / 60.0f;
static const int AthenaVelocityIterations = 8;
static const int AthenaPositionIterations = 3;

void Step() {
     PhysicsWorld->Step(AthenaTimeStep, AthenaVelocityIterations, AthenaPositionIterations);
 }
So the above code is called from our main game loop, so every frame we will step the world by 1/60 a second, doing 8 velocity iterations and 3 position iterations. This will simulate our square rigidbody being pulled down by gravity in our world.
However we still need to draw our cube in the correct location. That is our final step before our first goal and Box2D makes it super simple. A b2Body has both a position and an angle that are easily accessible. By accessing the position and angle it is easy to create a translation and then rotation from the respective values. By combining those two matrices it then gives us our model to world matrix. From there we right multiply that into the world to camera matrix and upload it to our shader before drawing.
In code it looks like this: (I am using glm which is a fantastic math library)
// Set a valid program to be used for rendering
glUseProgram(colourPassThrough.theProgram);

// Create an identity matrix
modelToWorldMatrix = glm::mat4(1.0f);

// Get the position of the jewels rigid body
// from this wrapper function
position = jewel->Position();

// Translate to the rigid body's position
modelToWorldMatrix = glm::translate(modelToWorldMatrix , glm::vec3(position.x, position.y, 0.0f));

// Rotate to the rigid body's rotation
// since our engine is 2D we know rotation will be about the z-axis
// for now I just feed that into the glm::rotate function
modelToWorldMatrix = glm::rotate(modelToWorldMatrix , jewel->Angle(), glm::vec3(0.0f, 0.0f, 1.0f));

// Create a model to camera matrix
glm::mat4 modelToCameraMatrix = worldToCameraMatrix * modelToWorldMatrix ;

// Upload the model to camera matrix to the program
glUniformMatrix4fv(colourPassThrough.modelToCameraMatrixUnif, 1, GL_FALSE, glm::value_ptr(modelToCameraMatrix));

// Finally render the object that will now have the correct position and rotation
jewel->Render();

// Remove program from context
glUseProgram(0);

/***Just for reference this is the very basic shader being used***/

#version 330

layout(location = 0) in vec4 position;
layout(location = 1) in vec4 colour;

smooth out vec4 theColour;

uniform mat4 modelToCameraMatrix;
uniform mat4 cameraToClipMatrix;

void main() {
    vec4 tempPos = modelToCameraMatrix * position;
    gl_Position = cameraToClipMatrix * tempPos;
    theColour = colour;
}

/***End***/
The above is a basic example of how to use the position and angle from the physics system to correct render the mesh. The first goal was reached!
Goal 2:
Goal 2 was to add ground and test that the rotation was working correctly. With all the setup done above, adding ground is very simple. It is identical to a Jewel except that it doesn’t require a b2_dynamicBody, the body remains static in the world and is not affected by gravity. So we do exactly what we did for the jewel, define a body (the type can be the default type), create the body, create a shape, define a fixture, create a fixture to bind the shape to the body.
Notice the clipping above. I made a mistake when defining my jewel body earlier. The line dynamicBox.SetAsBox(0.5f, 0.5f); should actually be dynamicBox.SetAsBox(1.0f, 1.0f); This was the reason for the clipping. I defined the physical box smaller than the mesh data, resulting in a simulation that doesn’t look quite right. I wanted to point this out because it was the first time I was able to use my graphics system to help pinpoint an issue with another system and it felt really good!
Now to test rotation I simply added another box and made the two box’s land one on top of the other causing the top box to fall over.
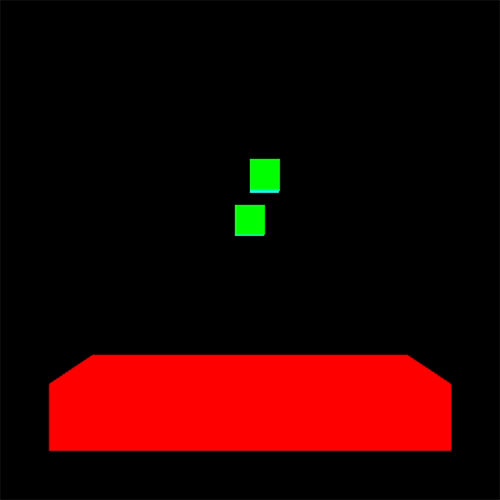
It works! The clipping is gone and the rotation is being rendered correctly.
Finally all the pieces are in place for us to complete the milestone. We have a physics system integrated into the engine. A Jewel class that is easily created and managed. And a very easy to understand main file with a core game loop. We can finally get a little crazy with the scene!
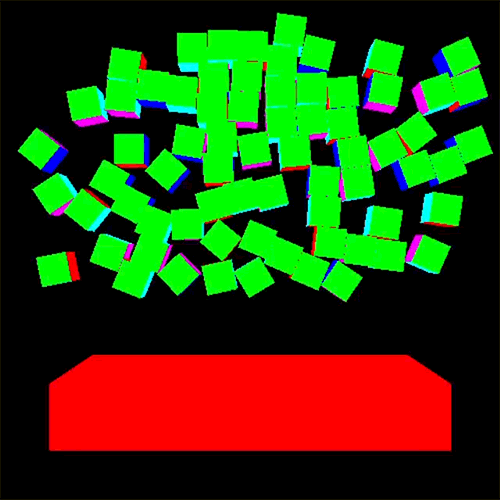
And there it is! We spawn a bunch of Jewels at random locations in a range and let Box2D take over!
Closing
In closing I took a little longer than I would have liked to on this milestone. I plan on completing the next one with a better timeline. Overall though I am happy with my progress to date and have learned so much about topics that I have always wanted to.
For now I am off to plan Milestone 3, which will probably be focused on some lighting or game play features. I hope you enjoyed!